This post may contain affiliate links. Please see my disclosure policy
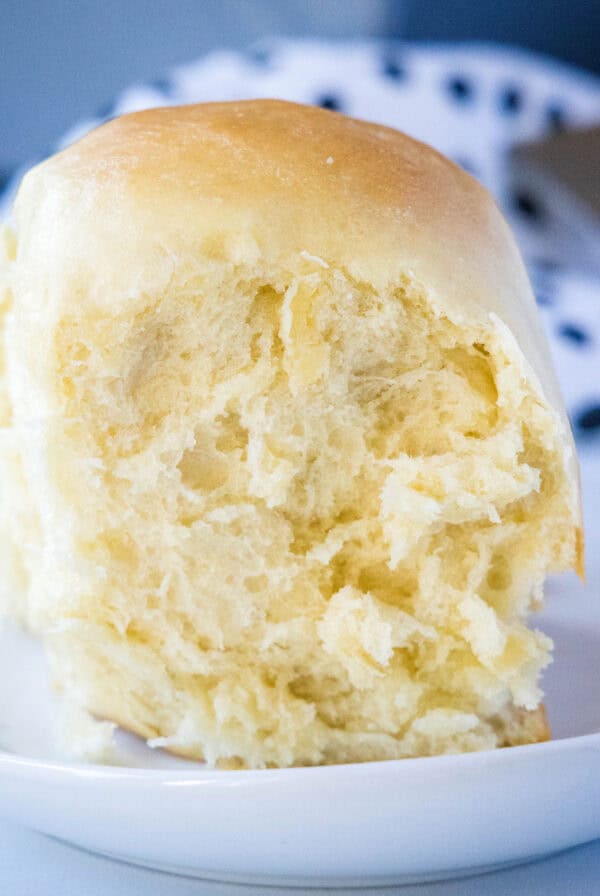
These Olive Garden breadsticks aren’t just as good as the restaurant version … they’re even better! They’re soft, buttery, garlicky, and super easy to make.

There’s a reason that Olive Garden breadsticks are so popular. Anyone who’s been to the restaurant knows how good they are. So it’s pretty exciting to tell you that I’ve got a recipe that’s every bit as good. In fact, these copycat Olive Garden breadsticks are even better than the ones at the restaurant.
These breadsticks are so soft and pillowy. They’re very buttery and have just the right amount of garlic. The breadsticks are perfect to eat by themselves, or for soaking up some pasta sauce from your plate. And best of all? They’re easy to make, and only use ingredients that you probably already have. You’ve got to try them.
Why You’ll Love These Copycat Olive Garden Breadsticks
I make these buttery breadsticks all the time. Here’s why I know you’ll love them.
- Fresh. The breadsticks at Olive Garden are fantastic. But you can’t beat breadsticks that are fresh out of the oven. You’ll be blown away at how tender and pillowy these breadsticks are.
- Simple. A lot of people don’t make bread because they think it’s too complicated. Some recipes definitely are difficult to make. But this isn’t one of them! This recipe is so easy to follow. It only has 7 ingredients, and they’re all common pantry items. And it only takes a little over an hour!
- Impressive. Everybody loves Olive Garden breadsticks. This means if you make this recipe for your friends, they’ll be blown away. I promise you that you’ll impress anyone that you serve these to.
What You’ll Need
Here’s everything you need to make this perfect copycat bread. Scroll to the recipe card at the bottom of the article to see the exact amounts for each ingredient.
For the Breadsticks:
- Water – The water needs to be at about 110F.
- Active dry yeast
- Sugar
- Bread flour – All-purpose flour will work in a pinch, but bread flour will make for a better texture.
- Salt
- Butter – Make sure to use unsalted butter.
For the Topping:
- Butter – You want to use unsalted butter for the topping, too.
- Garlic salt – If you don’t have garlic salt, you can replace it with a mixture of granulated garlic and salt.

How to Make Breadsticks Like the Olive Garden
Here’s how to make homemade breadsticks that taste just like the ones you get at Olive Garden:
- Prepare the yeast. Add the warm water, sugar, and yeast to a bowl. Let it sit for 5 minutes, or until it gets foamy.
- Mix the dry ingredients. Add the flour and salt to a mixing bowl and whisk together.
- Add the wet ingredients. Pour the water mixture and the melted butter into the dry ingredients. Mix until the dough starts to come together in a ball.
- Knead. Lightly flour a surface, and put the dough on it. Knead the breadstick dough for 5 minutes.
- Divide. Portion the dough into 12 equal pieces.
- Roll. Roll the 12 pieces into breadsticks.
- Place on a baking sheet. Line a baking sheet with parchment paper, aluminum foil, or a silicon mat. Place the breadsticks on top.
- Rest. Cover the baking sheet with plastic wrap or kitchen towels, and let the breadsticks sit for 45 minutes.
- Heat the oven. Preheat your oven to 400F.
- Bake. Uncover the breadsticks, and place the baking sheet in the oven. Bake until lightly browned, which should take about 12 minutes.
- Make the topping. Mix together the melted butter and garlic salt while the breadsticks are baking.
- Add the topping. When you remove the breadsticks from the oven, paint them with the buttery topping.
- Cool. Let the breadsticks cool slightly, then serve warm.
Tips for Success
Here are a few tricks and tips for making these copycat breadsticks.
- Use the right kind of yeast. There are a few different types of yeast. Each kind of yeast needs to be used differently. The most common is active dry yeast, which is what this recipe uses. Make sure that you’re using active dry yeast.
- Store your yeast properly. Yeast can last for a long time, but only if it’s stored in a dark and cool space. For best results, keep your yeast in the fridge or freezer. You can also keep it stored in a dark cabinet.
- Be careful with your yeast. It’s important to be precise when using yeast. Make sure to use the exact right amount, and heat the water to the perfect temperature. Also be sure to rest the dough for the right amount of time and not longer. Otherwise, the breadsticks might become dense.

Serving Suggestions
I like to eat these breadsticks the same way that they’re eaten at Olive Garden: with Italian food. They’re perfect for sopping up the extra sauce. Here are some of my favorite recipes to serve with these garlicky breadsticks.
- Homemade Lasagna
- Sausage Penne Pasta
- Sun-Dried Tomato Pasta
- Italian Chicken Bake
- Chicken Caesar Salad
Storage
Store leftover breadsticks in an airtight bag. They’ll last on the counter for 3 days, or in the fridge for 5 days. Reheat them for 5 minutes in a 350F oven, or in the microwave on 80% power in 15-second increments.
Freezing
You can definitely freeze leftover breadsticks. Wrap them in plastic wrap, and then place them in an airtight bag. Or just place them in 2 airtight bags. Store in the freezer for up to 4 months. Thaw or defrost before reheating, or reheat straight from the freezer in a 350F oven for 10 minutes.
More Homemade Bread Recipes
- Honey Oat Bread
- Cheesecake Factory Brown Bread
- French Bread Dinner Rolls
- Potato Bread with Chives
- Little Caesars Crazy Bread

Olive Garden Breadsticks
Video
Ingredients
For the breadsticks
- 1 1/2 cups warm water, 110 degrees
- 2 1/4 teaspoons active dry yeast, 1 package
- 2 tablespoons sugar
- 4 1/4 cups bread flour
- 1 tablespoon salt
- 2 tablespoons melted butter
For the topping
- 1/4 cup butter, melted
- 1 teaspoon garlic salt
Instructions
- In a small bowl, combine the sugar, yeast, and warm water. Let sit for 5 minutes, or until foamy.2 1/4 teaspoons active dry yeast, 2 tablespoons sugar, 1 1/2 cups warm water
- In a large bowl, whisk together the flour and salt. Add the yeast mixture and butter. Mix until it starts to come together in a ball.4 1/4 cups bread flour, 1 tablespoon salt, 2 tablespoons melted butter
- Turn dough onto a lightly floured surface and knead for 5 minutes.
- Form the dough into a square on your counter. Divide the dough into 12 equal pieces. Roll each piece into a bread stick.
- Place on a lined baking sheet. Cover and let rise for about 45 minutes.
- Preheat oven to 400F. Bake bread sticks for 12 minutes, or until lightly browned.
- Mix together the butter and garlic salt. Brush over the cooked breadsticks.1/4 cup butter, 1 teaspoon garlic salt
- Allow to cool slightly before serving
Notes
- Adapted from You Made That
- Store in an airtight bag at room temperature for 3 days, or in the fridge for 5 days.
- Reheat in a 350F oven for 5 minutes, or in a microwave on 80% power in 15-second increments.
- To freeze, wrap the breadsticks in plastic wrap and then put in an airtight bag. Store for up to 4 months.
Nutrition
Nutrition information is automatically calculated, so should only be used as an approximation.
I created a fun group on Facebook,and I would love for you to join us! It’s a place where you can share YOUR favorite recipes, ask questions, and see what’s new at Dinners, Dishes and Desserts (so that you never miss a new recipe)!
Be sure to follow me on Instagram and tag #dinnersdishes so I can see all the wonderful DINNERS, DISHES, AND DESSERTS recipes YOU make!
Be sure to follow me on my social media, so you never miss a post!
Facebook | Twitter | Pinterest | Instagram
.


Amazing!! Turned out perfect
They aren’t bad breadsticks, but they aren’t even close to olive garden breadsticks.
Better than Olive Garden breadsticks! I will be making these again.