This post may contain affiliate links. Please see my disclosure policy
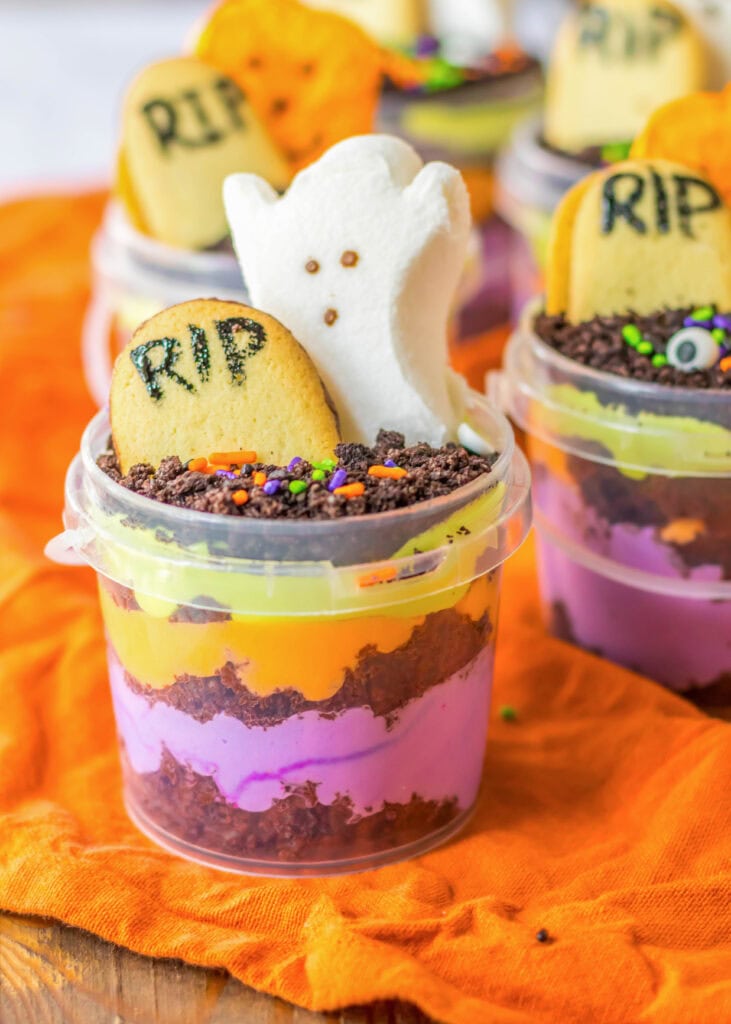
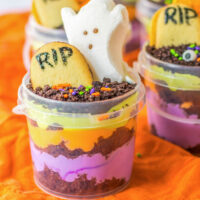
These Graveyard Halloween Pudding Cups are such a fun treat for Halloween! You can put them in little dirt cups like these or use clear plastic cups to make them fun for the kids and adults!
Halloween is such a fun holiday to make treats for! You can use green, yellow, purple and orange with just about anything, add candy eyes and you are done! Mummy Pretzel Rods are such a quick and easy one, or you can go the savory route like these Witch Hat Breadsticks. I am all about easy, but making it fun too!
Why You’ll Love These Halloween Pudding Cups
- Easy – you take help from the store to make these super easy! Just a box cake mix, some pudding and some whipped cream. You just have to spoon the layers in for an easy and festive treat.
- Fun – Get creative with the decorations and make these and scary or as fun as you like! These are graveyard themed, but you can mix up the decorations and have fun making it your own.
- Scary – What is scarier than ghosts! These are perfect for your Halloween party matching scary with cute
- Delicious – Use your favorite cake and pudding to make these cups easy and delicious!
What You’ll Need
Be sure to scroll to the bottom of the post for the FULL PRINTABLE recipe card.
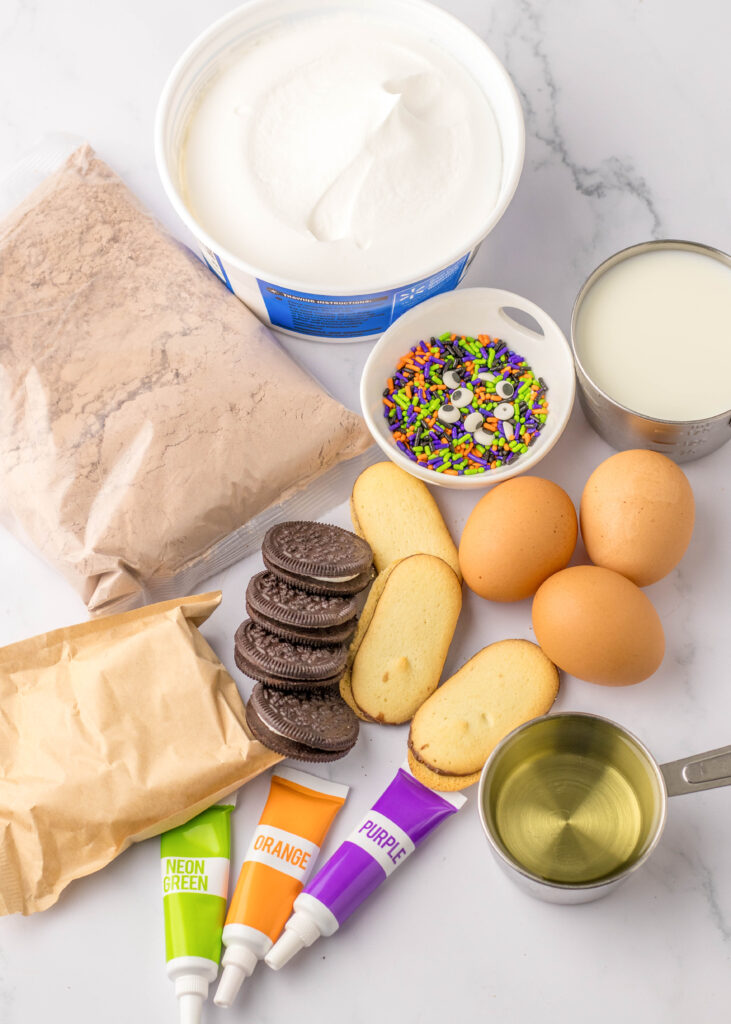
- Chocolate Cake Mix
- Water, Oil, Eggs called for on the box
- Vanilla Pudding – really any white pudding is what you need, so pick your flavor.
- Milk
- Cool Whip – or use homemade Stabilized Whipped Cream
- Green, Orange, and Purple Food Coloring
- Crushed Oreo Cookies
- Milano Cookies
- Candy Eyes – you can find these at Walmart, Hobby Lobby, Michael’s and lots of major grocery stores with the cake decorating supplies.
- Festive Sprinkles
- Clear Buckets – You can buy these on Amazon, you could also use clear plastic cups
How To Make Graveyard Pudding Cups
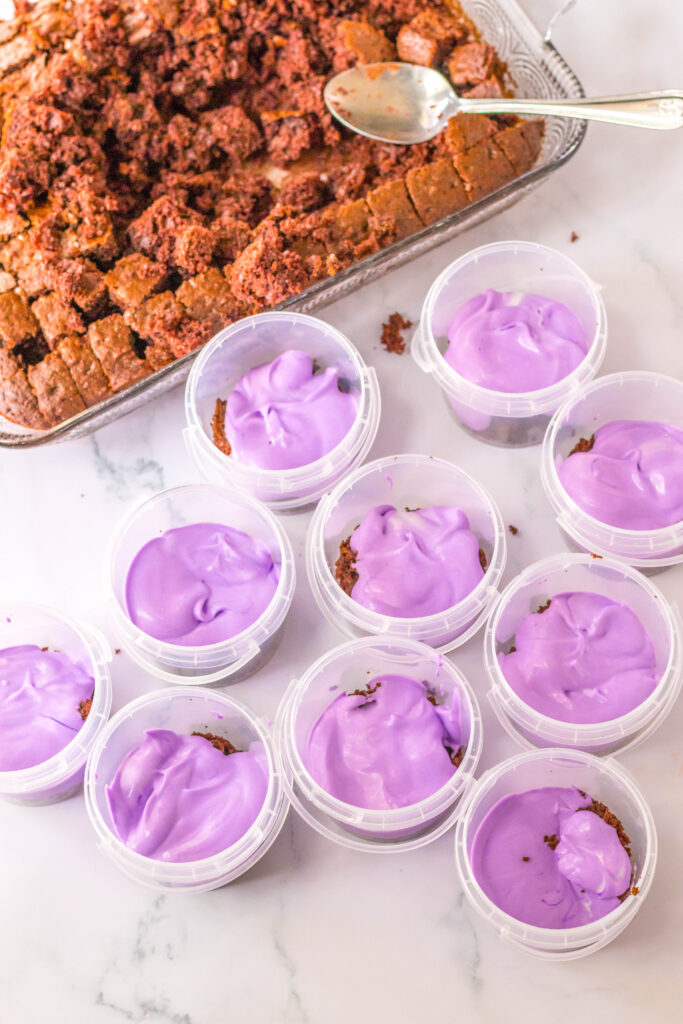
- Bake Cake. Start by baking the cake into a 13×9 inch pan according to the box instructions. If you have a homemade cake you like or want to buy an already made one, you are more than welcome to use that! Let the cake cool completely, and cut into tiny little 1 inch squares.
- Make Pudding. You need 2 boxes of white pudding that you whisk well with the milk until it starts to thicken. Fold in the whipped topping and let it set up in the fridge until thick and creamy.
- Color Pudding. Divide the pudding into 3 bowls, and color one with green, one orange, and the last one purple.
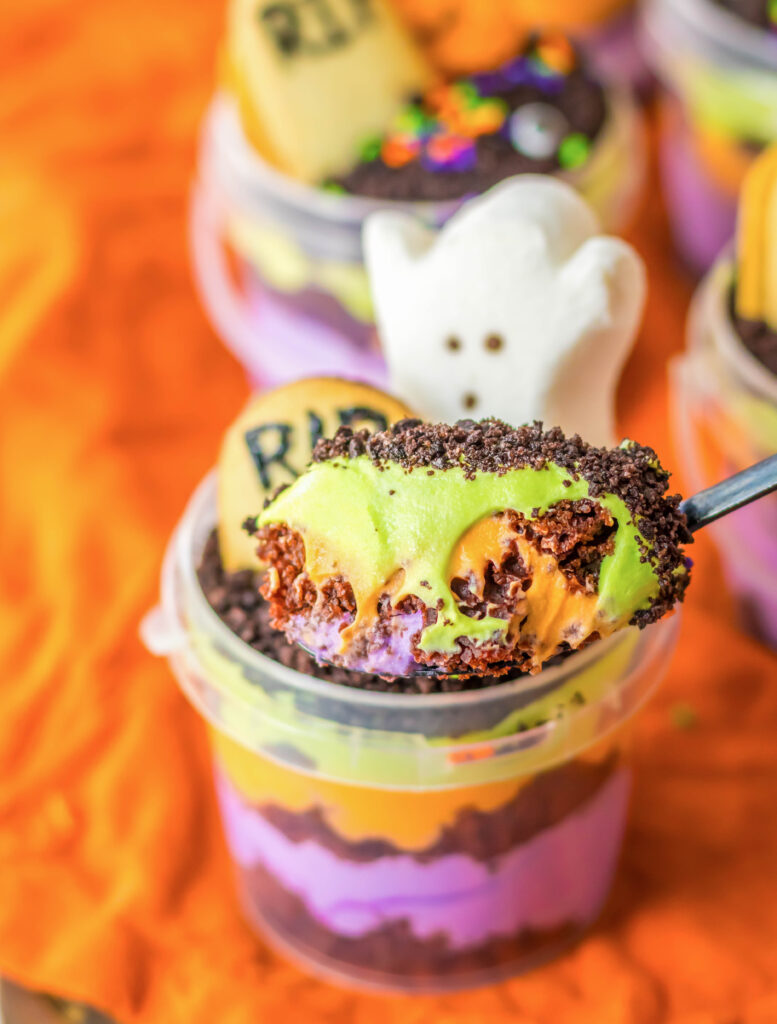
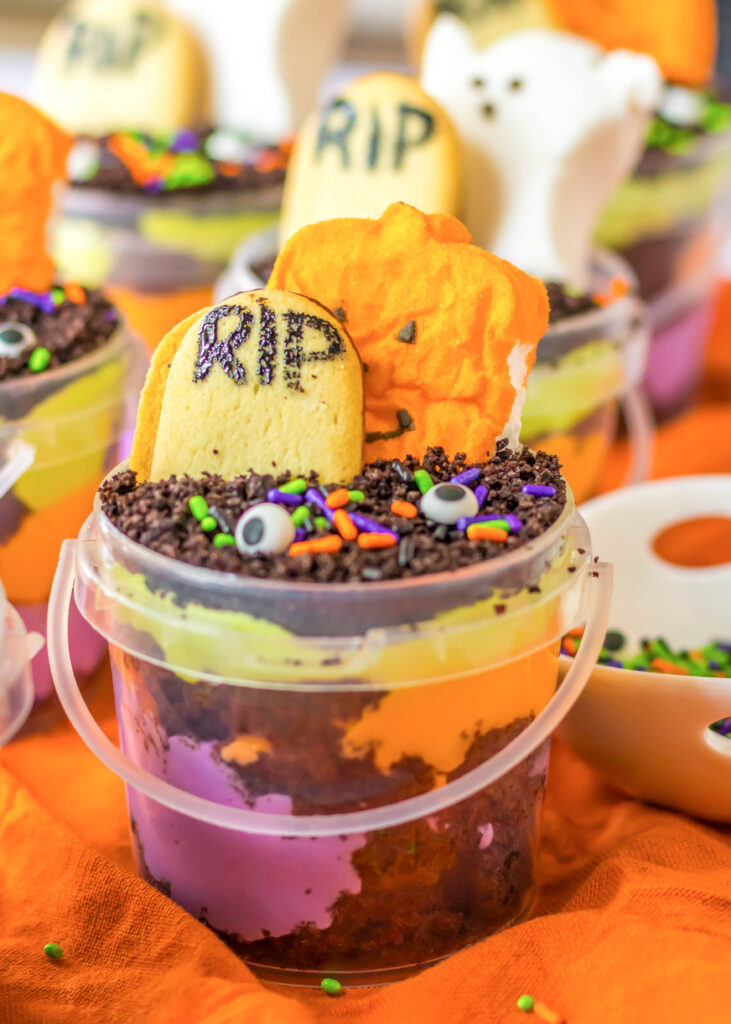
- Assemble. Once the pudding is thick and colored and the cake is cool it is time to assemble. Place a layer of cake in the bottom of each cup. Top with 1 color of pudding. Repeat until you have all 3 colors of pudding in the cups.
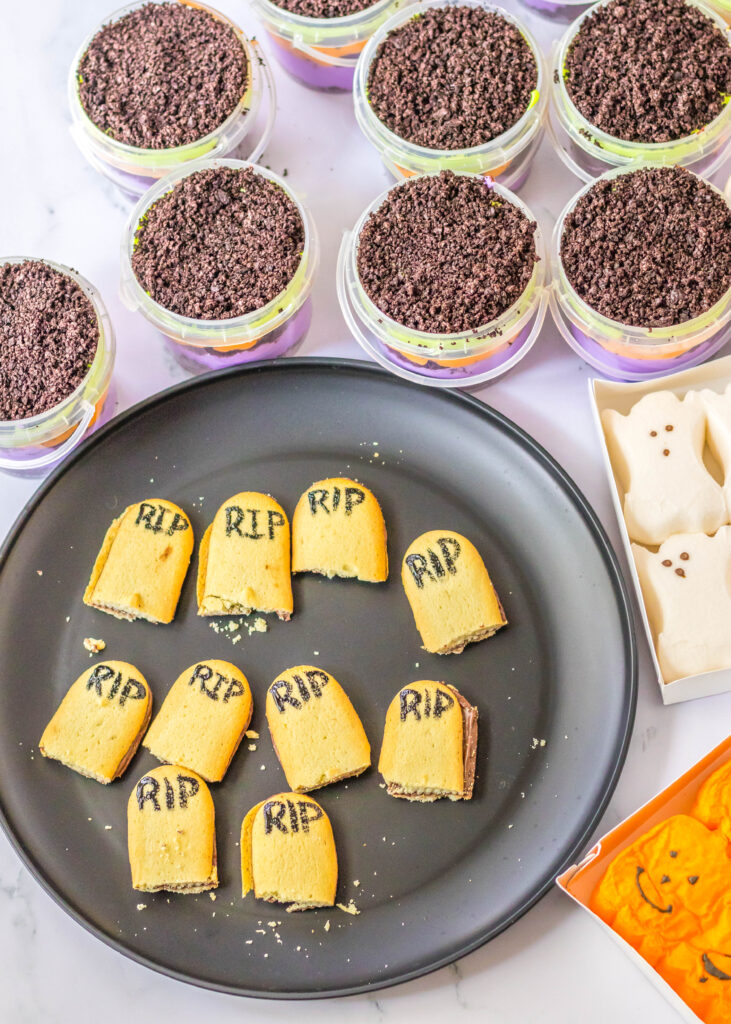
- Decorate. Now you can get creative. Top the last layer of pudding with crushed Oreo cookies to be the “dirt”. I added the RIP Cookies (instructions just below to make those) Peeps Halloween pumpkins and Ghosts as well as candy eyes and a few sprinkles. Simple but cute.
- Refrigerate. Let them set up in the fridge for about an hour before serving.
How to Make RIP Cookies
These are very simple to make, and there are multiple ways you can do it.
- First you want to cut or break each cookie almost in half, so that is resembles a hedgestone. You could also leave it whole and just push it down into the pudding enough if you wanted to.
- Using some of your food coloring, squeeze a tiny bit out on a plate, use a small paint brush to paint on the letters RIP.
- Decorating Gel – if you have or want to use black decorating gel (Wilton and other brands sell this in the baking aisle) you can pipe the letters onto your cookie. Just give it time to set up before adding it to your pudding cups.
Recipe Tips & Variations
- Don’t want to buy the buckets, use clear plastic cups and it works great!
- Sub brownies for the cake and these are still delicious!
- I used vanilla pudding, but you can use French Vanilla or Cheesecake are the other classic white ones that are easy to add coloring to.
- Get creative with the decorations. You can use the candy corn pumpkins or gummy worms instead of the Peeps candy for a different look.
- Don’t want to use food coloring? You can use chocolate pudding in the layers and make it all “dirt”. Or you can use natural food coloring that you can find in lots of stores these days.
More Fun Halloween Recipes
- Halloween Candy Bark
- Halloween Jello Shots
- Witches Brew
- Spooky Spider Brownies
- Ghost Cupcakes
- Mummy Granola Bars
Graveyard Halloween Pudding Cups
Ingredients
- 1 15.25 ounce box chocolate cake mix
- Water, oil and eggs called for on the box
- 2 3.4 oz boxes instant vanilla pudding
- 4 cups cold milk
- 8 ounces whipped topping, thawed
- Green, Orange, Purple Food Coloring
- 1 1/2 cups crushed Oreo cookie crumbs
- 10 Milano cookies
- Candy Eyes
- Festive Sprinkles
- 10 8 oz clear plastic buckets or cups
Instructions
- Preheat oven to 350º F.
- Prepare cake according to the package instructions, baking in a 13×9 inch pan. Once baked, remove from the oven and cool completely. Cut into small 1 inch cubes.1 15.25 ounce box chocolate cake mix, Water
- Meanwhile, in a large bowl whisk together pudding and milk until it starts to thicken. Fold in whipped topping. Place in the fridge for about an hour for it to thicken.2 3.4 oz boxes instant vanilla pudding, 4 cups cold milk, 8 ounces whipped topping
- Once the pudding is set, divide into 3 bowls and color each one (orange, purple and green).Green
- In the bottom of your bucket or cup place a layer of cake, top with one color of pudding. Repeat until you have all 3 colors of pudding.1 1/2 cups crushed Oreo cookie crumbs, 10 8 oz clear plastic buckets or cups
- Top each bucket with crushed Oreos.
- Cut or break off the bottom of each Milano cookie (or leave whole and insert further into the pudding so it is the right height). Put a tiny bit of food coloring onto a plate, and use a small paint brush to paint on the RIP. Or use Decorating Gel to write it on if you have it. Insert each cookie into the cup.10 Milano cookies
- Decorate each cup by adding candy eyes, festive sprinkles, Peep ghosts or pumpkins, candy corn etc.Candy Eyes, Festive Sprinkles
- Place in the fridge for 1 hour to let them set up before serving.
Notes
Nutrition
Nutrition information is automatically calculated, so should only be used as an approximation.
I created a fun group on Facebook,and I would love for you to join us! It’s a place where you can share YOUR favorite recipes, ask questions, and see what’s new at Dinners, Dishes and Desserts (so that you never miss a new recipe)!
Be sure to follow me on Instagram and tag #dinnersdishes so I can see all the wonderful DINNERS, DISHES, AND DESSERTS recipes YOU make!
Be sure to follow me on my social media, so you never miss a post!
Facebook | Twitter | Pinterest | Instagram
.


These are really fun treat for Halloween! Thanks for the recipe!
How cute and festive these Halloween cups are! I love the colors of this treat!
Can you make these a day ahead?
yes