This post may contain affiliate links. Please see my disclosure policy
Strawberry Jelly – a simple and delicious jelly with fresh strawberries. Sweet, delicious, smooth and great for sandwiches or on toast.
At the peak of strawberry season use those fresh berries to make this quick and simple homemade Strawberry Jelly. Just 4 ingredients is all it takes and you can have jelly on hand for the next year if you are into canning!
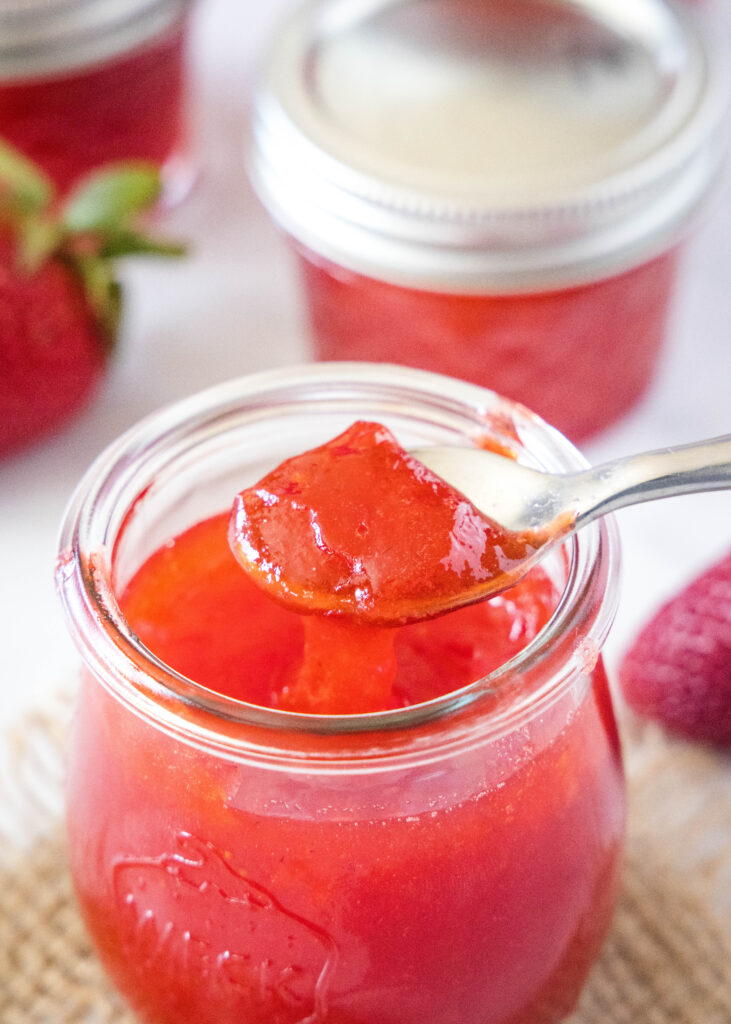
Table of Contents
Strawberry Jelly
When we lived in the Mid-West every summer we went to a local strawberry farm and picked strawberries. We came home with so many berries, and turned them into Strawberry Milkshakes, Strawberry Shortcake, Strawberry Popsicles, and just about anything else we could think of!
When I was little my grandma always used to make jam, jelly, and preserves and can them. I am not a big canner, I would rather freeze things, but don’t worry all of the instructions for both are included
What Is The Difference Between Jam and Jelly
These are terms that are often used interchangeable, but definitely mean something different.
Jelly – to make jelly you puree the fruit and then pour it through a strainer to capture just the juice. The pulp and seeds are then discarded. You cook just the juice with sugar to create a jelly.
Jam – to make jam you mash the fruit or use chunks of from to make the jam. So it will contain seeds and actual pieces of fruit.
The ingredients for both are very similar, it is really just about texture. A jelly is often pretty clear because it starts with just the juice. And it is not nearly as thick as a jam. So it really is just personal preference.
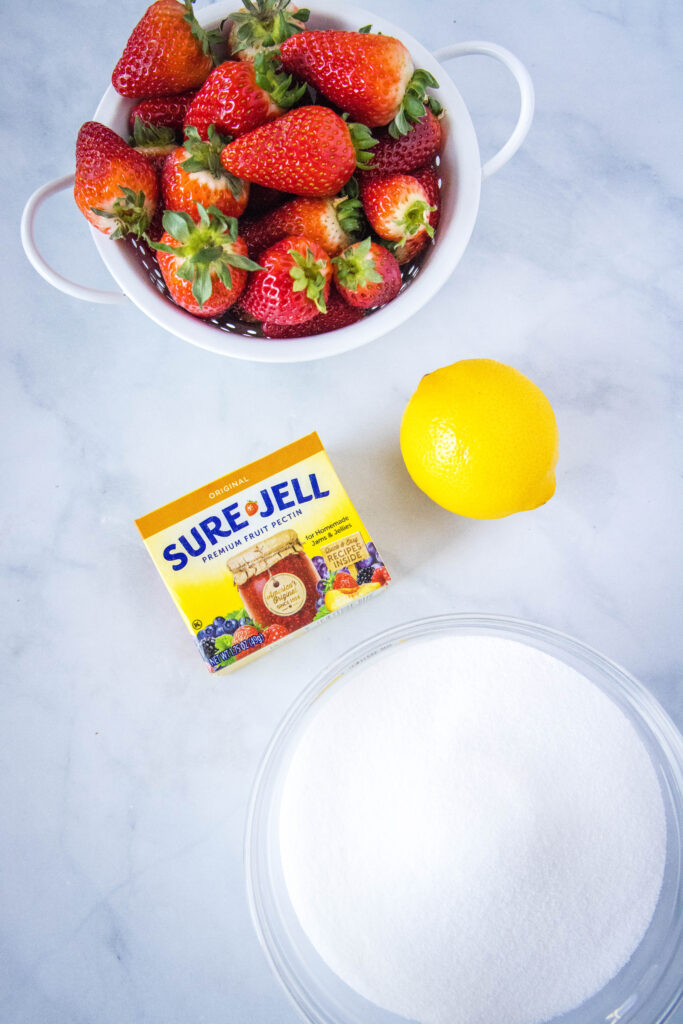
What You’ll Need to Make Strawberry Jelly
Be sure to scroll to the bottom of the post for the FULL PRINTABLE recipe card.
- Fresh Strawberries – you want the best fresh, bright red berries you can get.
- Granulated Sugar
- Lemon Juice
- Pectin – you can find this in the baking aisle of most grocery stores.
What Is Pectin
Pectin naturally occurs in the skin and rind of fruit. It is what helps it naturally set up jams and thickens them. Because with jelly you discard the skin and seeds, you miss out on the naturally occurring pectin in the fruit. So you need to use a product like Sure-Jell for pectin.
Artificial pectin is usually made from apple and citrus rinds that are turned into a powder. When you combine the powder with sugar and acid (the lemon juice called for) it will thicken and give you the jelly texture that you are looking for.
How To Make Strawberry Jelly
- Prepare Fruit. Start by washing your strawberries and removing the stems. You don’t need to chop them, just leave them whole. But if there are any bad spots, you can remove those.
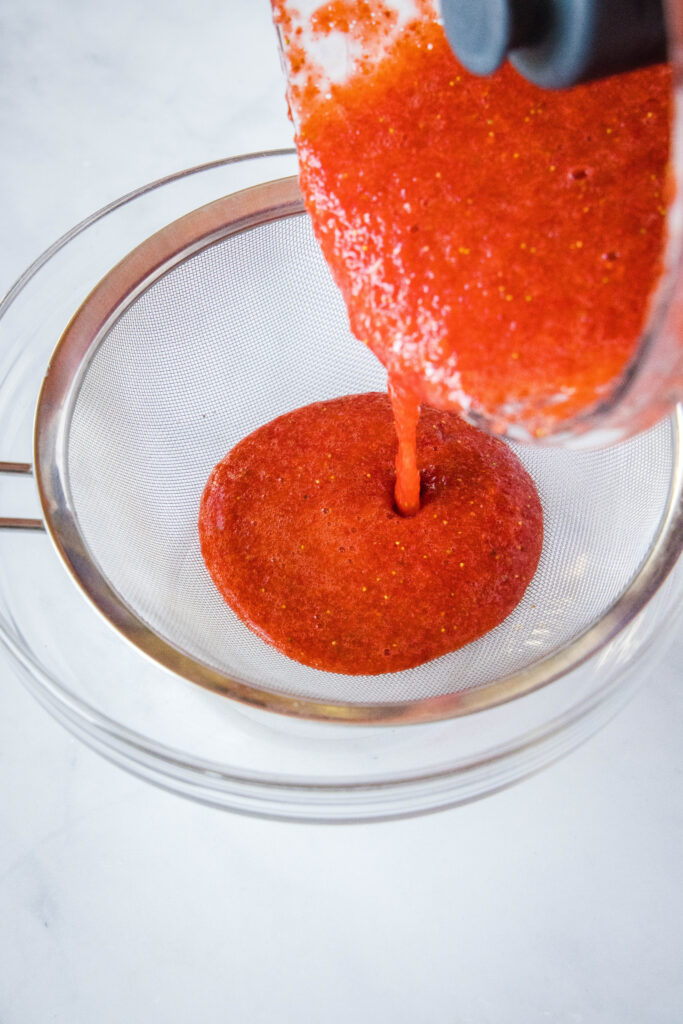
- Puree Fruit. Add the berries to a food processor or blender and puree until smooth and liquid.
- Strain. Pour the strawberry juice through a strainer. Press the mixture through, so you have mainly just juice below. The less seeds and pulp you get through the strainer the smoother and clearer your jelly will be.
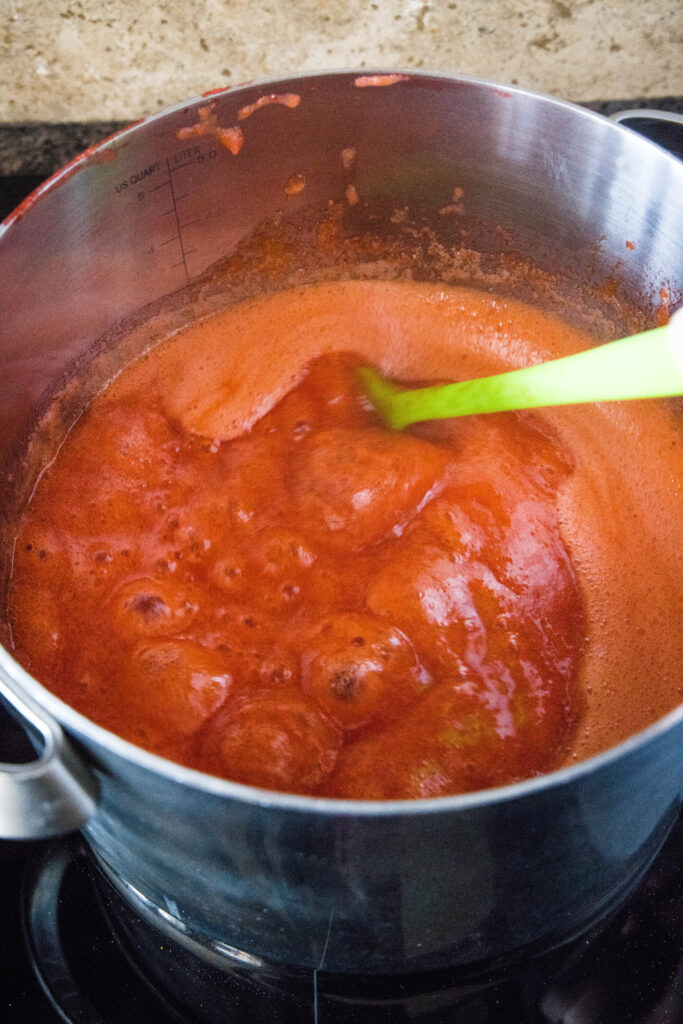
- Cook. Add the fruit juice, sugar, lemon juice, and pectin to a heavy bottom pot. Cook over medium heat until the sugar is dissolved. The pectin can clump when it is cold, so you might need to whisk it to get it fully incorporated and smooth. Once the sugar is dissolved bring to a boil over medium-high heat, and cook for 3 minutes, stirring frequently.
- Skim the Foam. While the jelly is boiling use a small strainer to scoop away the form that forms on the top. This step is optional, but it will lead to a clearer jelly.
- Reduce Heat. After 3 minutes, reduce the heat to medium low and let it cook for about 5 more minutes. If you have a thermometer you can test and it should be about 220º F, this is when you know your jelly is done and will set up.
- Remove from the heat and let it cool in the pot for 5 minutes.
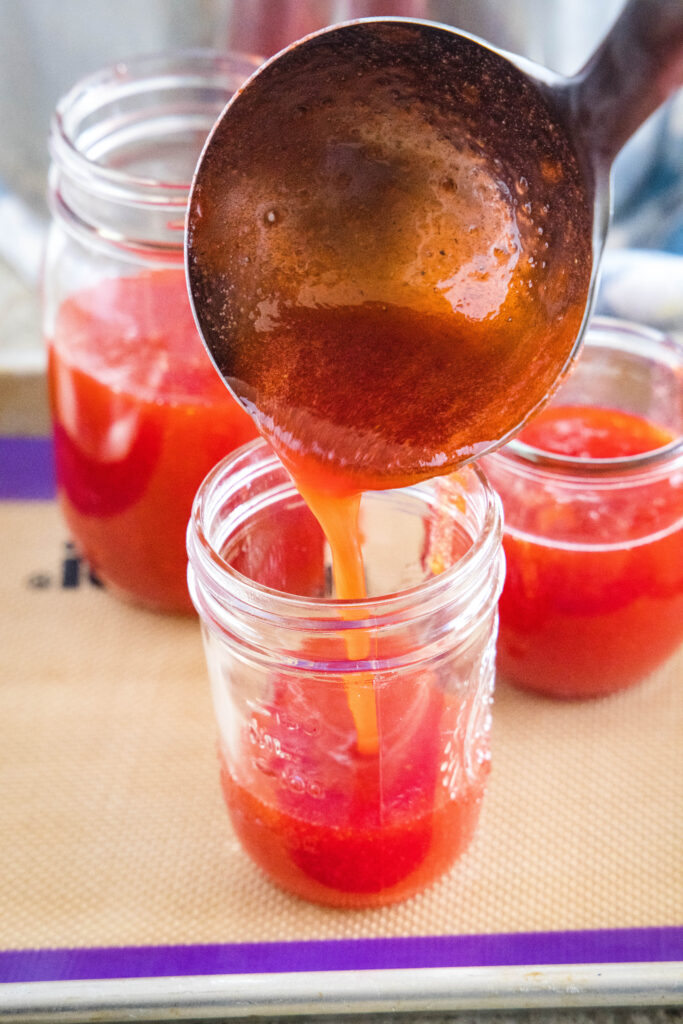
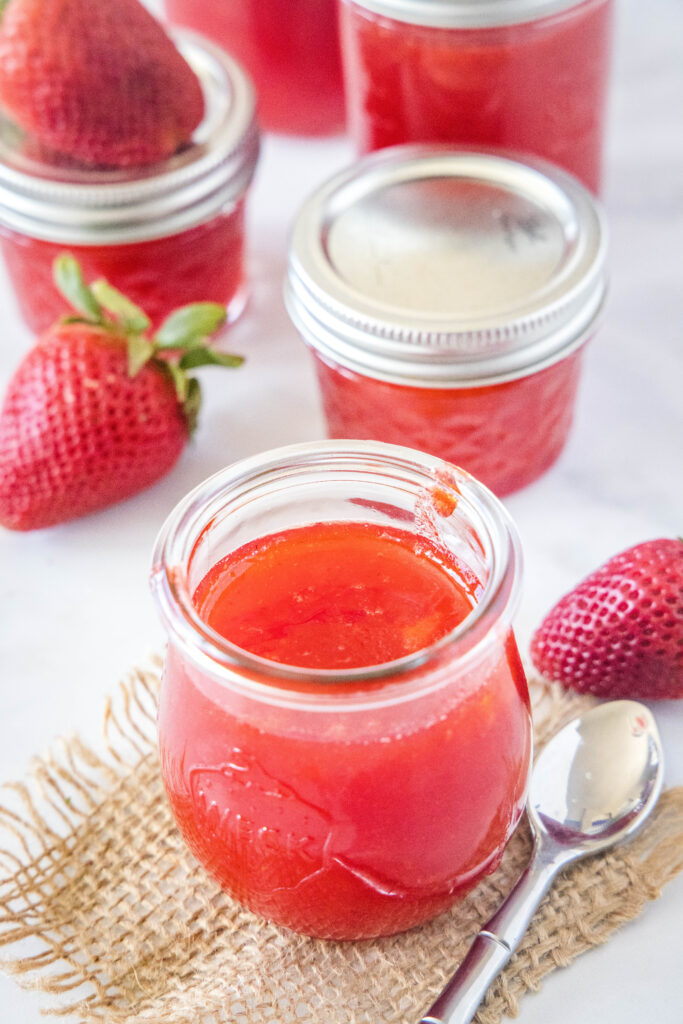
- Fill Jars. After 5 minutes divide the jelly into your jars and let it cool completely for the jelly to set up.
How To Can Strawberry Jelly
I have canned jelly many times in my life, but it isn’t a process I enjoy. I usually tend to just freeze the jelly, as it lasts 6-12 months in the freezer. But canning it can last longer, and not everyone has a large freezer to store it in. So it is a great option and not that hard to do.
- Sterilize the jars. One of the most important steps in canning is to make sure the jars and lids are very clean. You need about 4-8 oz jars.
- Fill the jars. Fill the jars with the hot jelly mixture, leaving about 1/4 inch at the top. If you have any that spills along the side, make sure to clean the edge well, so it seals and stays safe to eat.
- Boil. Bring a large pot of water to a boil. If you have a canning rack, place it in the pot.
- Lower the jars. Gently lower the jars into the water onto the rack. Make sure there is enough water to come to the top of the jars, it is ok if there is more, but not less.
- Simmer. Bring the water to a low boil or cook for 15 minutes.
- Remove. Carefully remove the jars from the water and place on a kitchen towel to cool. I like to use a tongs to gently remove the jars from the water, so they don’t break and you don’t burn yourself.
- Cool. As the jars cool you will hear the lids pop and know they are sealed. After a couple of hours, gently press on the lids to ensure that it is tight and fully sealed. Store in a cool dry place for 12-18 months.
How To Store Strawberry Jelly
There are lots of different ways to store jelly, it depends on how quickly you use it and the tools you have.
Fridge – you can store homemade jelly in an airtight container for up to 2 months
Room Temperature – you can store jelly in an airtight container for up to 2 weeks in the pantry.
Canning – see the instructions above. Canned jelly will last in a cool dry place for at least 12-18 months.
Freezing – store strawberry jelly in an airtight container in the freezer for up to 6 months.
Pro Tip: Make sure to label and date your jelly no matter how you store it, so you know if it is still good and safe to eat.
Recipe Tips & Tricks
- Don’t skip the lemon juice. Lemon juice is often called for in jams and jellies because it helps balance the flavor and cut the tartness. But especially in this recipe, you need the acid to help activate the pectin. So it will not set up if you don’t use enough lemon juice.
- Thermometer. When you use pectin it makes using a thermometer not necessary, but that doesn’t mean you can’t use it to know when you are done cooking. The jelly should get to 220º F when it is cooking.
- Want a clear jelly? A true jelly is clear because it is made with just the juice. So the more pulp and seeds that get through the strainer the couldier your jelly will be. Also when it is boiling, the more foam you can scoop off the top, the clearer your jelly will be.
- Setting. Jelly is a lot looser than jam. It will spread and be relatively thin comparatively. The amount of pectin is going to determine how thick or set your jelly is. If you want a thicker jelly that you need to actually scoop out with a spoon, you can use an additional packet of Sure-Jell.
Best Uses for Jelly
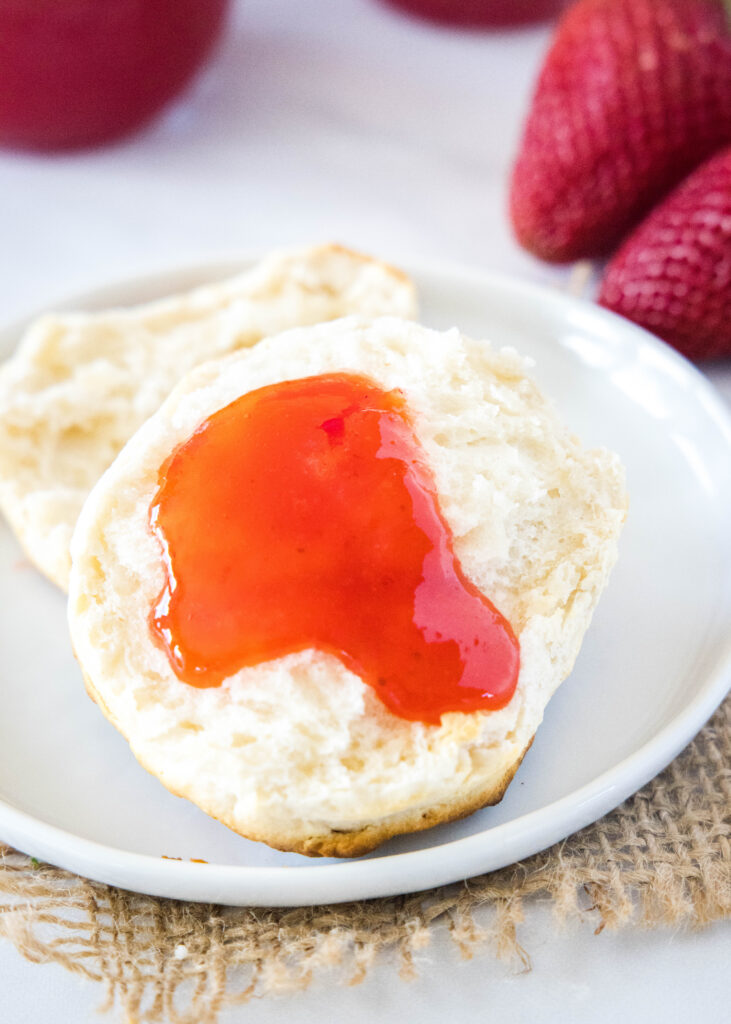
You really can use jelly in any way you normally would Mixed Berry Jam or even preserves. In a peanut butter sandwich, on toast, or on top of a Buttermilk Biscuit.
- Scones – serve on top or along side
- Strawberry Poptarts – perfect for the filling
- English Muffins
- Lemon Pancakes – makes for a great topping!
More Summer Fruit Recipes
- Strawberry Poke Cake
- No Bake Blueberry Cheesecake
- Cherry Cobbler
- Raspberry Lemon Cupcakes
- Strawberry Muffins
- Blueberry Banana Bread
- Raspberry Sauce

Strawberry Jelly
Ingredients
- 3 pounds strawberries
- 2 1/2 cups granulated sugar
- 1 Tablespoon lemon juice
- 1 1.75 ox box Sure Jell
Instructions
- Start by washing your strawberries and removing the stems. You don't need to chop them, just leave them whole. But if there are any bad spots, you can remove those.3 pounds strawberries
- Add the berries to a food processor or blender and puree until smooth and liquid.
- Pour the strawberry juice through a strainer. Press the mixture through, so you have mainly just juice below. The less seeds and pulp you get through the strainer the smoother and clearer your jelly will be. You will end up with about 4 cups of juice.
- Add the fruit juice, sugar, lemon juice, and pectin to a heavy bottom pot. Cook over medium heat until the sugar is dissolved. The pectin can clump when it is cold, so you might need to whisk it to get it fully incorporated and smooth. Once the sugar is dissolved bring to a boil over medium-high heat, and cook for 3 minutes, stirring frequently.2 1/2 cups granulated sugar, 1 Tablespoon lemon juice, 1 1.75 ox box Sure Jell
- While the jelly is boiling use a small strainer to scoop away the foam that forms on the top. This step is optional, but it will lead to a clearer jelly.
- After 3 minutes, reduce the heat to medium low and let it cook for about 5 more minutes. If you have a thermometer you can test and it should be about 220º F, this is when you know your jelly is done and will set up.
- Remove from the heat and let it cool in the pot for 5 minutes.
- After 5 minutes divide the jelly into your jars and let it cool completely for the jelly to set up.
Notes
Storing Jelly
Fridge – you can store homemade jelly in an airtight container for up to 2 months Room Temperature – you can store jelly in an airtight container for up to 2 weeks in the pantry. Canning – see the instructions above. Canned jelly will last in a cool dry place for at least 12-18 months. Freezing – store strawberry jelly in an airtight container in the freezer for up to 6 months.Nutrition
Nutrition information is automatically calculated, so should only be used as an approximation.
I created a fun group on Facebook,and I would love for you to join us! It’s a place where you can share YOUR favorite recipes, ask questions, and see what’s new at Dinners, Dishes and Desserts (so that you never miss a new recipe)!
Be sure to follow me on Instagram and tag #dinnersdishes so I can see all the wonderful DINNERS, DISHES, AND DESSERTS recipes YOU make!
Be sure to follow me on my social media, so you never miss a post!
Facebook | Twitter | Pinterest | Instagram
.


How many cups of strawberry mixture?? Not pounds, cups???
1 pound of strawberries = approx 3 3/4 cup of strawberries. It kind of depends on the size of them how many cups it will be. Strawberries are sold in 1 pound packages, so it is best to use weight for accuracy.
Easy instructions ending with excellent results.